I could not find any guides how register your own Custom Tools in Visual Studio 2012. MSDN guide is wrong
So I have to take Process Monitor and using trial-and-error approach I found out how to develop and register a Custom Tool in VS2012.
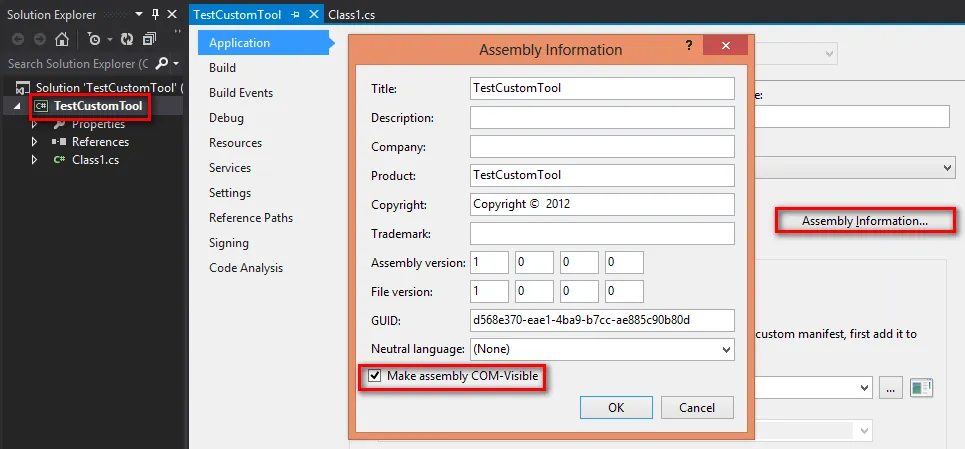
1. Install Visual Studio 2012 SDK 2. Create a new Class Library project in Visual Studio 2012. 3. Open Project Properties -> Application -> Assembly Information -> Make assembly COM visible
4. Add project references to the following assemblies (should be in GAC after step 1)
- Microsoft.VisualStudio.OLE.Intero
- Microsoft.VisualStudio.Shell.Interop
- Microsoft.VisualStudio.TextTemplating.VSHost.11.0
5. Implement your generator. Use code below as an example. According to documentation it is enough to just implement IVsSingleFileGenerator interface. But that interface is too complex and is too low-level abstraction. So we will use better high-level abstraction from BaseCodeGeneratorWithSite base class.
 using System; using System.Runtime.InteropServices; using System.Text; using using System;
using System.Runtime.InteropServices;
using System.Text;
using Microsoft.VisualStudio.TextTemplating.VSHost;

namespace TestCustomTool
{
    [ComVisible(true)]
    // TODO: Replace with your GUID
    [Guid("3B850477-71D3-4916-A3A3-D1BD0749BFAA")]
    public class TestCustomToolGenerator : BaseCodeGeneratorWithSite
    {
        public override string GetDefaultExtension()
        {
            // TODO: Replace with your implementation
            return ".test.txt";
        }

        protected override byte[] GenerateCode(string inputFileName, string inputFileContent)
        {
            // TODO: Replace with your implementation
            var generatedText = string.Format(@"{1}{0}{0}Filename: {2}{0}{0}Timestamp: {3}", Environment.NewLine, inputFileContent, inputFileName, DateTime.Now);
            return Encoding.UTF8.GetBytes(generatedText);
        }
    }
}
6. Compile the project.
Now our tool is developed and we have to register it
7. Copy resultant dll into some persistent place, e.g. C:\Program Files\TestCustomTool\TestCustomTool.dll 8. Start command prompt as admin 9. Register assembly using the following snippet
# TODO: Replace with your dll file C:\Windows\Microsoft.NET\Framework\v4.0.30319\regasm.exe /codebase "C:\Program Files\TestCustomTool\TestCustomTool.dll"
10. Create and execute the following Install.reg file
Windows Registry Editor Version 5.00
; TODO: Replace with your GUID
[HKEY_CURRENT_USER\SOFTWARE\Microsoft\VisualStudio\11.0_Config\CLSID\{3B850477-71D3-4916-A3A3-D1BD0749BFAA}]
"InprocServer32"="C:\\Windows\\System32\\mscoree.dll"
"ThreadingModel"="Both"
; TODO: Replace with your class
"Class"="TestCustomTool.TestCustomToolGenerator"
; TODO: Replace with your assembly
"Assembly"="TestCustomTool, Version=1.0.0.0, Culture=neutral"
; TODO: Replace with your dll file
"CodeBase"="file:///C:\\Program Files\\TestCustomTool\\TestCustomTool.dll"
; TODO: Replace with your tool name
[HKEY_CURRENT_USER\Software\Microsoft\VisualStudio\11.0_Config\Generators\{FAE04EC1-301F-11D3-BF4B-00C04F79EFBC}\TestCustomTool]
; TODO: Replace with your GUID
"CLSID"="{3B850477-71D3-4916-A3A3-D1BD0749BFAA}"
"GeneratesDesignTimeSource"=dword:00000001
; TODO: Replace with your description
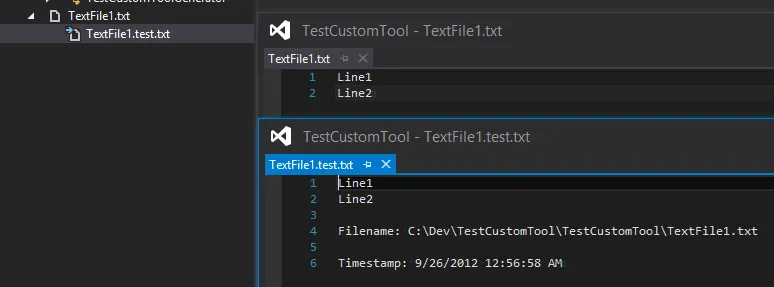
@="Test Custom Tool"11. Now your Custom Tool is registered. Let’s try if it works 12. Restart Visual Studio 13. Open any project 14. Create text file 15. Modify property of this text file and set it to be TestCustomTool  16. Write some context to that file and save it. 17. If we are lucky we don’t get any errors and will see nested .test.txt file - congratulations! We did it!
You can get all the sources used from repository https://bitbucket.org/mnaoumov/testcustomtool-vs2012/